
May you have all treats and no tricks!!
Enjoy!


Easy, quick, inexpensive and the kids love it.
So perfect it's scary!
Please ignore the mess on my stairs in the background-it's been a party getting ready, cupcake baking, crazy kind of day.
Grab a trash bag and a pair of scissors and you're ready. Hopefully, you can find a pair of scissors without searching through the whole house like I did! I use any kind of trash bag I have-I don't think I've ever used a heavy duty one like suggested.
I follow the directions here. I usually start by cutting up about a 1/2 inch in on one side and then all the way across the top. Don't pull too hard after you've cut your strips or the strip will tear. No worries if one does though, just adds to the spookiness. The one I made about still needs to be stretched out a bit.
The kids love walking through this to get into the party. We have three doors to get into the gym and I usually put them on all the doors and then put spider webs all over the tops and sides of the doors. Some of the strips get pulled off during the party, but I've never had alot. The kids just like jumping up and touching them as they walk in.
Have a great Halloween Weekend!
I'm linking up to Weekend Bloggy Reading with Amanda at Serenity Now

All the girls picked their own magazines. My oldest was Seventeen and my 10 year old was Sports Illustrated. Guess you can tell what they both love-although, my 13 year old doesn't read Seventeen, she loves anything fashion. We also had a Glamour magazine, a Kids National Geographic and a puppy lover's magazine.

The girls really enjoyed working on their costumes and thinking of all the catchy phrases for the front covers.
We used foam board for the covers-my sister thought of that-I was going to get poster board, but I'm glad I wasn't in charge of purchasing supplies, poster board would have been too floppy. My brother-in-law cut a hole in each foam board so the girls could put their face in it. We used the computer to print out the titles of the magazines and make them larger and used different fonts and colors to make all the phrases. We cut those out and glued them on. We traced one of my 5 year old's shirts for the body and colored them in.
Easy, quick, inexpensive, fun and creative!
and they won Most Original!!
I just love that this costume was age appropriate and they had so much fun creating it and they'll always remember when they dressed up as magazines.
So excited too-the Lady Bug Costume I made for my 5 year old was featured on Tatertots and Jello. Be still my heart-there was just a bit of jumping and screaming in the house this morning......oh, and the kids were real excited too! They loved seeing their sister and she looks so cute if I do say so myself!! Just a bit biased you know!
I'm linking up to these parties
Weekend Bloggy Reading at Serenity Now, Look at Me Party at Fun to Craft, I'm Loving It Fridays at Tidy Mom, Weekend Wrap Up Party at Tatertots and Jello, Categorically Crafting at Someday Crafts-costumes
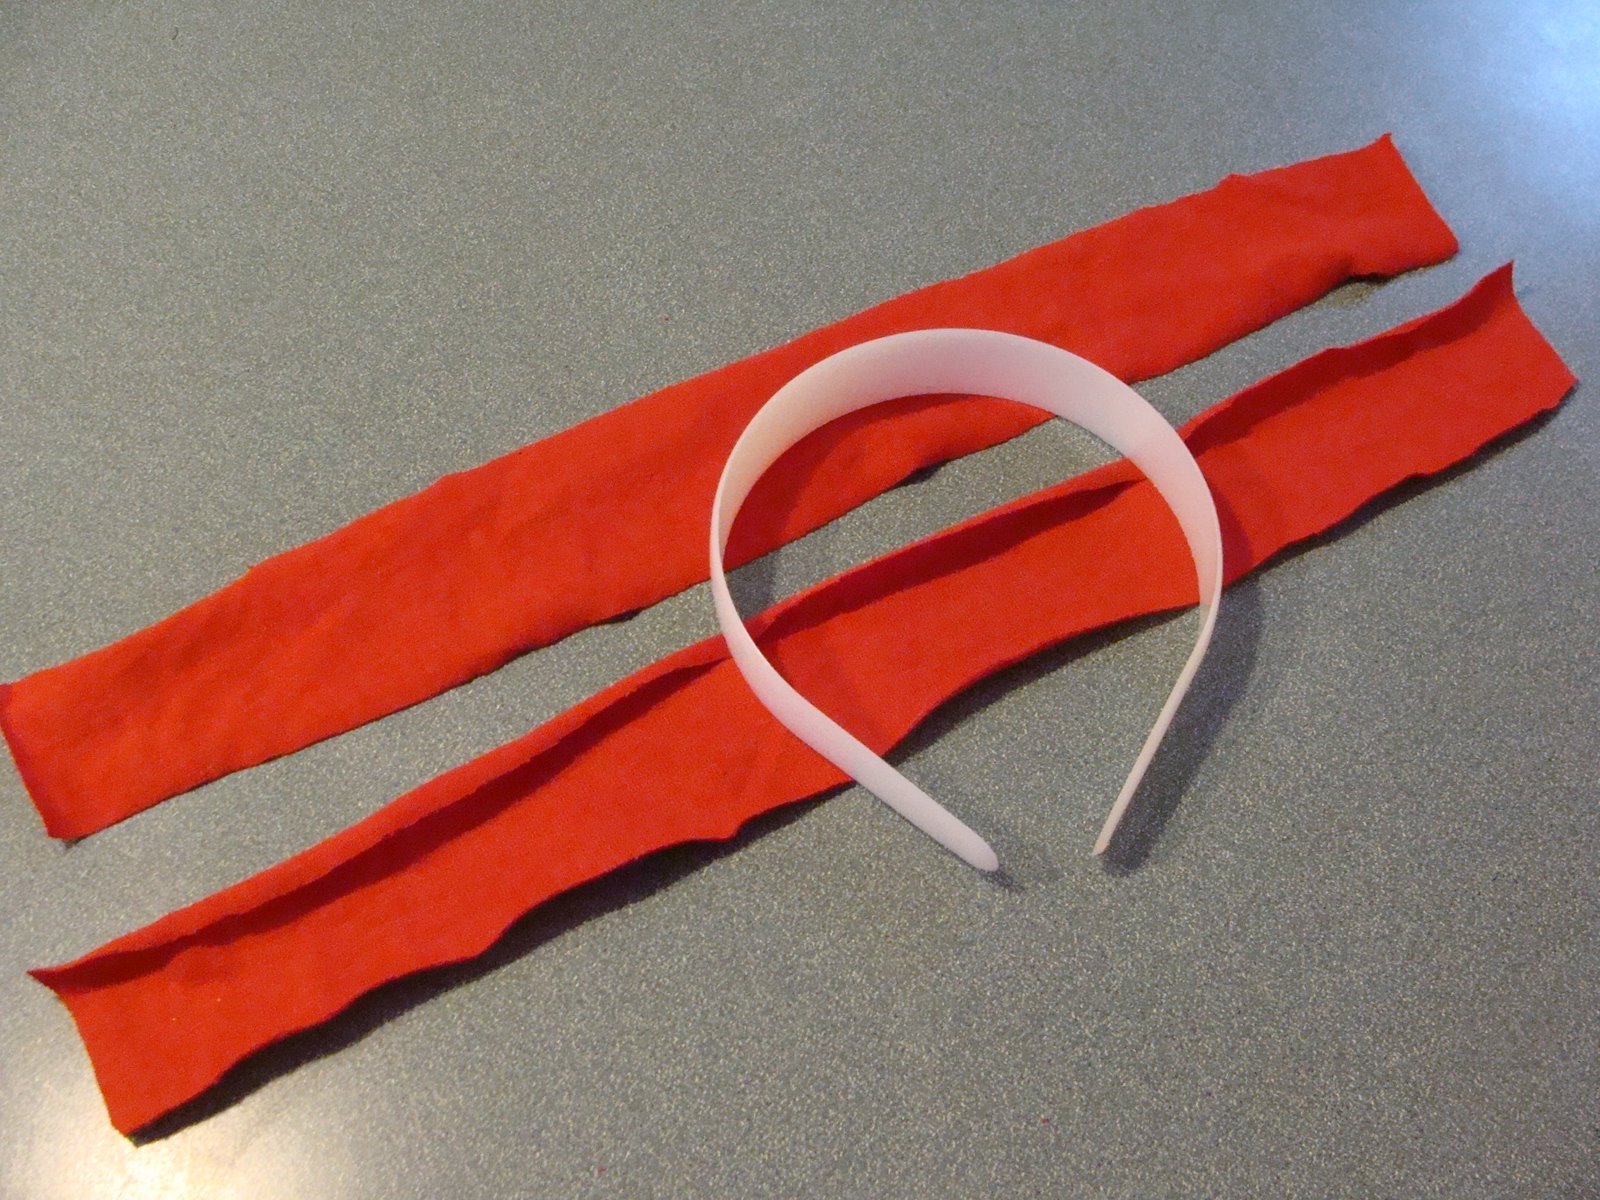
and just wrapped the strips around the headband. I used my glue gun at the beginning and end and in the middle when I ended one strip and started another.

I then took 2 black pipe cleaners and wound them around my thumb. I glued 2 black pom poms on the end of each-only used 2 because Walmart didn't have the bigger size pom pom.

I just wrapped the end of each pipe cleaner around the headband and twisted the ends together. Quick, easy and cute!
At this point in my lady bug costume making, I was beginning to run out of time. I also had to pack all our clothes and the camper. Although I would have loved to make fancier wings-and probably will for Halloween-I decided clothes and food for the weekend were more important.
I decided to make a pair of wings out of cardboard and decorate them. I grabbed a cereal box for the cardboard, traced a wing shape using the side of the box as the middle of the wings and cut them out. Now, when you hold the wings by the middle piece (the side of the box), they are not flat but point outwards and also flutter back and forth. Yeah, I planned that.

I attached the wings, after they were decorated, to the back of her lady bug dress using ribbon, but need to find a better way to attach them. I'm thinking velcro.
A cute, fast, easy and inexpensive costume idea! Next this week, a great idea for tweens/teens that's also cute, fast and easy. And doesn't cost a lot of money or need a lot of supplies.

The costume was super easy too and mostly made with what I had around the house.....easy and cute and inexpensive.....even better!
The PolkaDot Chair has a cute pillowcase shirt tutorial that I've been wanting to try and thought it would be perfect for this project. I started with a red men's tshirt and pretty much followed the tutorial along with some shortcuts.

Since the the tshirt didn't have side seams I figured I'd save some time and work, I just cut the length of the shirt and left the sides and hem of the tshirt.....score one for quick and easy! I followed the tutorial to cut the armholes but because the tshirt is jersey, I didn't put any bias tape around the arm holes.......score two for quick and easy!

I turned over the top edge of the shirt 3/4 of an inch but didn't turn it 1/4 first....score 3 for easy! I threaded in my elastic-I ended up cutting the elastic 1/2 the measurement of the top edge-and sewed in my ribbon.

I then took a old pair of black jersey shorts and used a cream cheese container to trace circles. I sew about 7 on the front and 5 on the back.

Since it was a little chilly, we paired the shirt up with a long sleeve red shirt and black leggings.
She loved her "lady bug dress" and even wore it the next day!

Since this is getting a bit long, I'll share how I made the headband antenna and a trick I accidentally discovered while making the wings over the weekend.
Next week I'll share a quick, easy, inexpensive, fun costume for tweens/teens that can really express their personality!
I'm linking up to these parties
Weekend Bloggy Reading at Serenity Now, Friday Pity Party at 30 Days, Look at Me Party at Fun to Craft, I'm Loving It Fridays at Tidy Mom, Weekend Wrap Up Party at Tatertots and Jello

Oh yummy chocolate goodness! I almost didn't get this picture because these cookies didn't last too long in our house.
The cookies were delicious, easy to make and hours later still soft and chewy. They were quick to mix up but you do have to let the dough sit in the fridge for an hour before baking. Luckily I had nothing planned that day because I totally missed that when reading the recipe and drooling over the pictures. Also, take the first suggestion and get all your ingredients together before you start baking. You know, just in case you finished your vanilla the last time you baked and have to run down cellar to get more while you leave your 2 year old with a bowl of cookie dough..... just saying.

My son was happy to help with the most important part of the baking process-eating the chocolate chips, but not so happy to have his picture taken.

This is the response I got when I asked him if I could have a chocolate chip. His hands very slowly slid over and covered his pile of chocolate chips. No chips were leaving his pile.

The best part of making chocolate chip cookies!
Linked to Wordful Wednesday at parenting BY dummies

I'm assuming my oldest daughter did it.
My morning giggle.
Please be safe today as you snack!


I think this picture has Christmas card written all over it!
My oldest daughter wants to make an apple pie-her favorite-she's just waiting for mom to get the pie crust ready....i.e. get to the grocery store and buy one. One day, yeah, one day, I'll try crust from scratch
Since I don't think we'll ever be able to eat all the apples we have, I was looking around for some other goodies we could make and found some yummy ones! Like oh I wish I had these ingredients in the house yummy!
Like This recipe from How Does She? . Sounds so delicious. I'm almost afraid to make it. I might eat is all. But I have to. It sounds just too good. Anything that is described as dipped in heaven is my kind of goodie! I've never made carmel sauce so I can't wait to try it.
And this recipe for apple crisp. Right up my alley. I don't really care for apple crisp with oatmeal in the topping. Now if you made if for me I'd eat it but not my favorite. There's an easy apple sauce recipe too.
And a recipe for a different take on the classic apple pie at Hoosier Homemade. Yum for walnuts.
Oh, and apples are great for breakfast. I'd love to wake up to these apple strudel muffins. With a cup of coffee.
I'm linking up to Weekend Bloggy Reading with Amanda at Serenity Now.

A few stains, a bit stretched out, nothing too horrible.
As I was folding it, I thought "Boy, the bottom of this shirt would make a cute skirt!"
Which was immediately followed by the thought "and I wouldn't have to do all the gathering!"
I am constantly blown away by all you bloggers who refashion shirts, dresses, all kind of clothes, into some other beautiful item to wear. Then you share them with all of us and often tell us how you did it.
Just because.
So, I decided to try it.
First, I cut the bottom off of the shirt. I left enough fabric so I could fold it over to make my waistband. I first thought about adding on my own waistband but then figured I was just making work for myself.

I do have to admit, yeah, just keeping it real. I did mess up this step a bit. I was using 3/4 inch elastic so I brilliantly said "ok, my waistband needs to be an inch wide and I need about 1/4 to sew with." I then proceeded to cut up 1 1/4 inches totally forgetting that I had to fold over the fabric and it should have been 2 1/4 inches. Well, I really wanted to use a smaller elastic anyways. Chalk it up to rushing and the kids playing all around me.
I folded over the fabric I had cut, sewed close to the edge and then threaded my elastic through.

You know my mantra....quick and easy and my daughter loves it! A great skirt for the fall.
Now to use the scraps to fix up a shirt to match. The shirt had ties in the back that I removed so I have those, the trim around the neckline and the plain brown knit. I'd love to hear your ideas and suggestions.
Friday is a busy day for parties-I love, love, love to see everyone's projects and ideas.
I'm linking up to these parties
Weekend Bloggy Reading at Serenity Now, 30 Days Pity Party Friday, Look at Me Party at Fun to Craft, I'm Loving It Fridays at Tidy Mom, Weekend Wrap Up Party at Tatertots and Jello
 Witches Curtains